Showing posts with label streamer. Show all posts

Monday, January 16, 2017

Revamping Valentine boxes!!

I love my newly revamped old Valentine boxes...this one has the sweetest valentine of a pussy cat.
I want to show you how easy it is to do it yourself! 
Here are my ugly boxes....a pink one from goodwill...$1.
There was dirt and marks on it....making it sort of sad looking. 
And this one is alright...but just advertises Russel Stovers. 
I gathered up supplies...like my party streamers.
I LOVE party streamers because they are usually dirt cheap at thrift stores and are easy to work with.
I just took my white party streamer and started gathering it up with my fingers and pressing it down to keep the gathered shape. 
I then started hot gluing it to the edges...making it evenly hanging over the edge a bit. 
I started at the top middle point of the heart.
Lucky was helping ...like a good tabby cat.
He put his paw on things I should try next...no kidding...he is amazing. 
I kept going around in layers.
When going around curves...just tuck to go around. 
I wanted another color to be added. 
It was addicting to keep on going. 
I love the sweetness of it...reminds me of Marie Antoinette. 
While I was working on this....I took my old valentine ...glued it onto cardstock and then added glitter.  I let it dry.

This is the kitty valentine I used. 
I covered it up alot. 
All these pics were taking while watching tv...so I am sorry the pictures are a little crazy and dark. 
I also covered up the little red box. 
I added white too. 
I glued the kitty valentine on the center....glued ribbons under it (with a heart button) and added a few stickers. 
I put a dog valentine on this one.
They are sooo cute and corny at the same time! 
Now my boxes are not sad...
I can proudly put them out and enjoy.
Here is my last tip:
Don't put party streamers in the sunshine...they will fade...
but maybe you want it to fade?  It would look vintage if it was faded....lol.

Have an amazing day!

Come to the Home Matters Linky party!  Come to the Pin Me linky Party!  Come to Craftastic Mondays!

Wednesday, October 7, 2015

Goblins, Ghouls and Ghosts...Oh my!!

Goblins, Ghouls and Ghosts...Oh my!!
My last Halloween pattern of the year is finally ready.
It is a large one!
Finished design measures:  20" long x 17" wide.
This is a fun & easy project that looks perfect on your front door. 
Look at the sweet Pumpkin treat holder.
Notice the Candy canes and Lollipop. 
Not all ghosts are scary!  Celebrate a Merry Halloween with this sweet ghost & pumpkin treat holder design.  It will make your Halloween decor complete  The ghost wears a "Friendliest ghost" badge... he is a sweetie.
 Other badge designs are: A Haunting we will go and Merry Scaring.
I also have it on my website.
I had many more designs in the works....but I didn't have enough time to complete them.
I did make 6 this year...so I am pretty happy with productivity....lol.
Here is a little message from my cat Lucky....he thinks he should get paid for modeling....the currency is cans of wet food.
My hubby spoils them so!

Come to What to do weekends!  Come to Home matters!!!  Come to the Pin me linky party!  Come to DIY Crush craft Party!!  Come to the Party Bunch!

Tuesday, May 12, 2015

Congrats graduates...fun idea!

Can you believe it is already time for this year's graduates to graduate?
Seems like this spring has went really fast.
Are you needing an idea on how to decorate for the big Graduation party?
For this easy project...I used a few supplies...
A Deflecto wet erase board in the stand....
Deflecto's cool and bright markers for chalk boards.
Party streamers 
and tape or glue.  
This is how the sign looks undecorated. 
It is double sided....it looks the same on the back as it does on the front.
I am a big fan of party streamers...
they are sooo inexpensive and easy to get in any color.
I cut a 4 inch piece....then cut three slits longways in the strip. 
I put many colors together and did the same thing to all of them.
You can make this much thicker by adding many more strips.

I just rolled up the non cut end. Glue or tape to secure.
I scrunched up the party streamer ends with my fingers...lightly. 
These markers are so bright and much nicer than colored chalk...
they erase easily with water and paper towel. 
I wrote my message and added the pom pom's to the sign.
Choose your school colors! 
The sign is great all year round....for whatever you want to use it for.
Here I wrote a to-do list.
I can see me using it for funny messages to my daughter....
personalizing it for birthdays....
changing it for all the holidays....
welcoming guests to the party...
Etc...
- - - - - - - - 
Next year my daughter will be the graduate....her colors are orange and black....
wow time flies!


Come to Thrifty Thursday!  Come to the Pin me Linky Party!!  Come to the Party Bunch!

Tuesday, October 7, 2014

Etsy tips and being featured!

I am excited to be a featured artist 
It is a cat-like curiosity.
Sarah is a creative, an artist, a musician, a writer, a blogger and a creativity coach, based in the UK.
-------------
The post is about.... the secrets of Etsy success!
I share my story, etsy tips for sellers, answer questions, and much more.....please check it out!!
----------------------
This is my newest pattern...
There is a joyfulness in the air.  
This little Pumpkin guy is making merry...in October!  
Make this embroidery design in a flash....so quick, easy and fun to do.  
Add color and glitter... this is simply sweet!  
Finish the design in a hoop with frilly ruffled edges....so unique
Finished design measures: 18" long with streamers x 9 3/4"
Embroidery design measures:3 1/2" x 6 1/4"
--------------------------
I just want to remind you to sign up for my emails
....it is right on the left side bar of my blog here...by my about me page link.
This is a great way to always see my freebies, new patterns, tips, ideas, and more!


Come to pin me linky party and thrifty thursday....so fun!


Tuesday, November 12, 2013

Yarn, strings, & streamers

Happy Tuesday to you!
I wanted to share pics of my studio with you...It will take a while...but today I am showing you my yarn, strings, & streamers.
I love collecting these items....I do not crochet....simply because I never know what to do at the end of a row...lol.
I use these items to craft with though.
Here I have a child's shopping cart that I spray painted gold.
It was at a thrift store...all rusty and dirty.
The white cart is a plant stand....goodwill.
I love to store my yarns there.

I use these with tags, adding to quilts and stitcheries, on presents, as pieces of any collage, and doll hair.

Here is my cute drying rack...I use it to hold my baskets of goodies!
This way I can see pretty easily what I need.
Most every item comes from a thrift store....I do not need more than one of each since I am not crocheting or knitting.

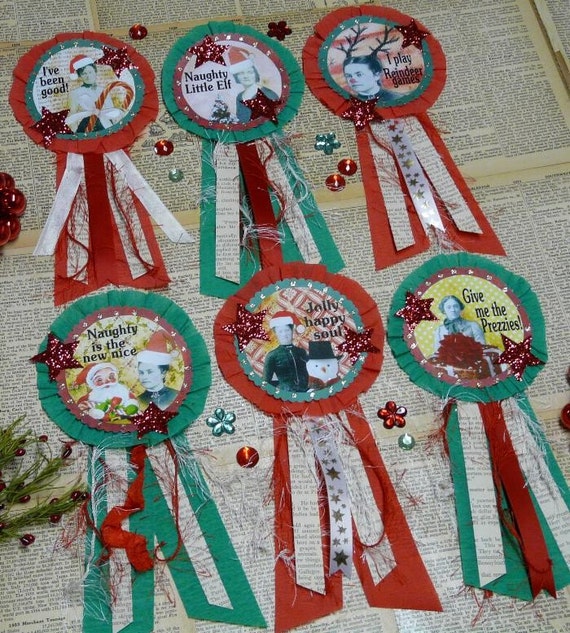
I have every color of party streamer there is....they make great badges.(I have made patterns for every badge possible).  Party streamers are so cheap and I feel they are so underestimated in crafting.
Christmas Santa Art Badges E Pattern - Pins doll PDF jewelry old photos ribbon paper crepe star primitive altered art party
My badges...here is one of the Christmas ones.

I love the stringy glittery kind on yarn!

At the top of my rack are spools of ribbon, yarn in the wire vase, and thread.
Wow, my fan is looking like it just might fly away.
I got those lights in the background in the summer....for my birthday.

Red ribbon ...ready for Christmas,Valentines day, and the Fourth of July.

I don't need any more...no place to put it!

This is by my Sewing area....threads...and my spools of tulle.
I LOVE Tulle.
Great for my party hats and lots of other crafting goodness.
-------------------------------------------------------------------------
Tootles!


Monday, April 22, 2013

Cherry Blossom Tutorial

Happy Monday....the sun is shining here....but it still cold!
Today I want to share what I did yesterday. 
 I made my own Cherry blossoms!
I am going to make more...but I wanted to share how to do it....then I can fill up my pitcher later today.

These are CHEAP to make.
No cost for branches/twigs.
Party streamers are dirt cheap.  Glue....hardly any money on that.

They last forever...or until they get really dusty.....lol

I just love cherry blossoms!
Onto the project....
Here are the supplies: Party streamers (you know how I love party streamers!), twigs, scissors, and hot glue gun/sticks.  When picking out a twig ( I just went to my backyard...seems to be an abundance that fell after a wind storm)...make sure to pick a sturdy twig with sturdy branches.  Trim your twig if needed.  Cut your pink streamer to 5 1/2" long and  your yellow to 1" long. 

Fold the yellow in half length wise and then again making a small rectangle.
Fold the pink in half length wise.

Cut petals loops in the pink....leave the folded edge uncut.

Wrap the yellow around the twig and hot glue down....this is the center of your blossom.

Gather up the pink in your hand alittle.

Start gluing the pink onto the twig.

Turn and gather up more of the pink and glue.

Glue any areas that need it and hold until set.

Spread petals (gently) out.  You don't need to add the whole length of pink streamer....just cut off the extra.
Or you may want your blossom full.

Make flowers for all twig branches....but you can leave some stems without flowers if you want to.
Originally I did one big twig...but I think doing several smaller twigs would be easier.
Now...to make more!!!!

Come to the party at Whipperberry's Friday Flair!