

This is an easy to do project...using the business calendars we sometimes get free. My husband gets one for me every year. I love the calendar because it shows 3 months at a time....but I don't like the truck picture:(

I want to cover the truck picture with some pretty papers and supplies...plus try to recycle old items that might be cast away.

This is a calendar make-over I did last year. I used Marie Antoinette & France as my theme pictures.

I love inspiring quotes! I cut out the letters from fonts from my computer and glued them down.

The supplies are simple: scissors, gluestick, distress ink (vintage photo), iridescent glitter, a paintbrush for painting, a small stiff paintbrush to use in the ink, Aleene's paper glaze, old book & music pages, hole puncher, white acrylic paint, and a free business calendar.

Also ...you will need an inspiring word... I used my "Cricket" paper cutter to cut out "Dream"....but you could also cut out printed letters using different fonts from your computer...or letters from magazines.

For a lovely picture... I am using a lil book from the thrift store that has seen better days. Use any lovely picture that speaks to you. I love kitties so I went with this ...that I have had in my stash.

This was only 50 cents...what a deal!

I am choosing this cute picture from the book.

Measure the area you want to cover up.

I chose this old book page and a piece of old music paper.

Glue the papers down using a glue stick.

I cut my main picture to fit in between the other papers.

Glue the main picture in place.

Arrange your letters where you would like them to be.

Using white acrylic paint and a brush....paint around the letter area....you can be sloppy about it.

Paint the entire area where the letters will go.

Using gluestick....add glue to back of letters.

Glue down all your letters in place.

I had my letters tilt downwards...and a little unevenly placed...for more interest.

Cut out some stars from old book pages and music papers.

Glue stars in "Empty" areas.

Make sure the star paper is different than the background paper.

Using a small stiff brush...rub it in the aging ink.

Rub inked brush on edges of letters to shadow them. I always image the sun being in the left hand upper corner of artwork....place a shadow where a shadow would be cast from the sun.
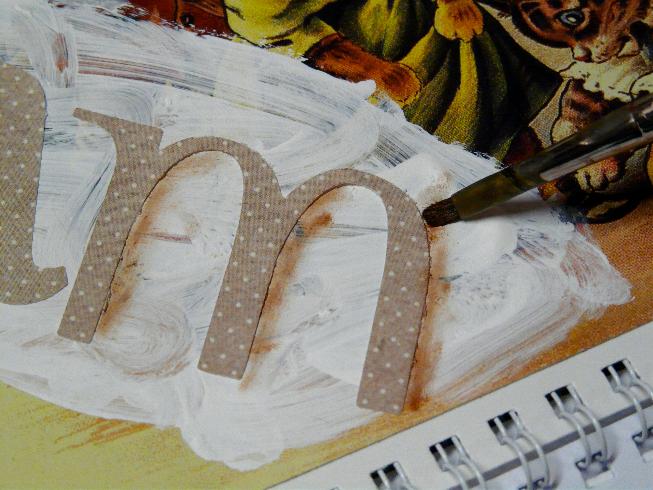
Rub inked brush as much as you like...the more you do it the more dramatic it looks.

The letters have many edges...inside the letters as well as outside the letter.

Add shadows to the stars too!

Looks pretty good...doesn't it!!!

I like to add glitter to add extra charm. Take the Aleene's paper glaze and run a line along areas where the light or sun would face it.

Add glitter. Have a piece of paper under the project to capture the glitter.

Shake glitter off....and repeat on more areas of the letters. stars, and on your pictures well.

I drew a star on the stars with the paper glaze ...and added glitter. Add glitter on kittes hat, collars, plate...whatever needs alittle light.

This is the calendar all done. Just use your hole punch to make sure you can hang it.

This will look lovely in my studio and will inspire me all next year!
Awesome tutorial, easy to follow instructions. Love the pictures of each step!! Thanks
ReplyDeleteA.Bozzi
Gorgeous! I love the tutorial and that this is a "make do." Very, very nice!
ReplyDelete