Welcome July!
It's already hot and Summer has kicked into full gear.
I changed up the style on my calendars a little. This month I am featuring a patriotic crow.
Imagine this guy stealing a piece of apple pie!
Cute and naughty.
Do you have plans for the 4th of July?
Last year all plans were cancelled.
I'm hoping everyone will have a good time this year and enjoy!

This desktop calendar has the left hand side for icons to be seen easily. Click here for the download.
------------------

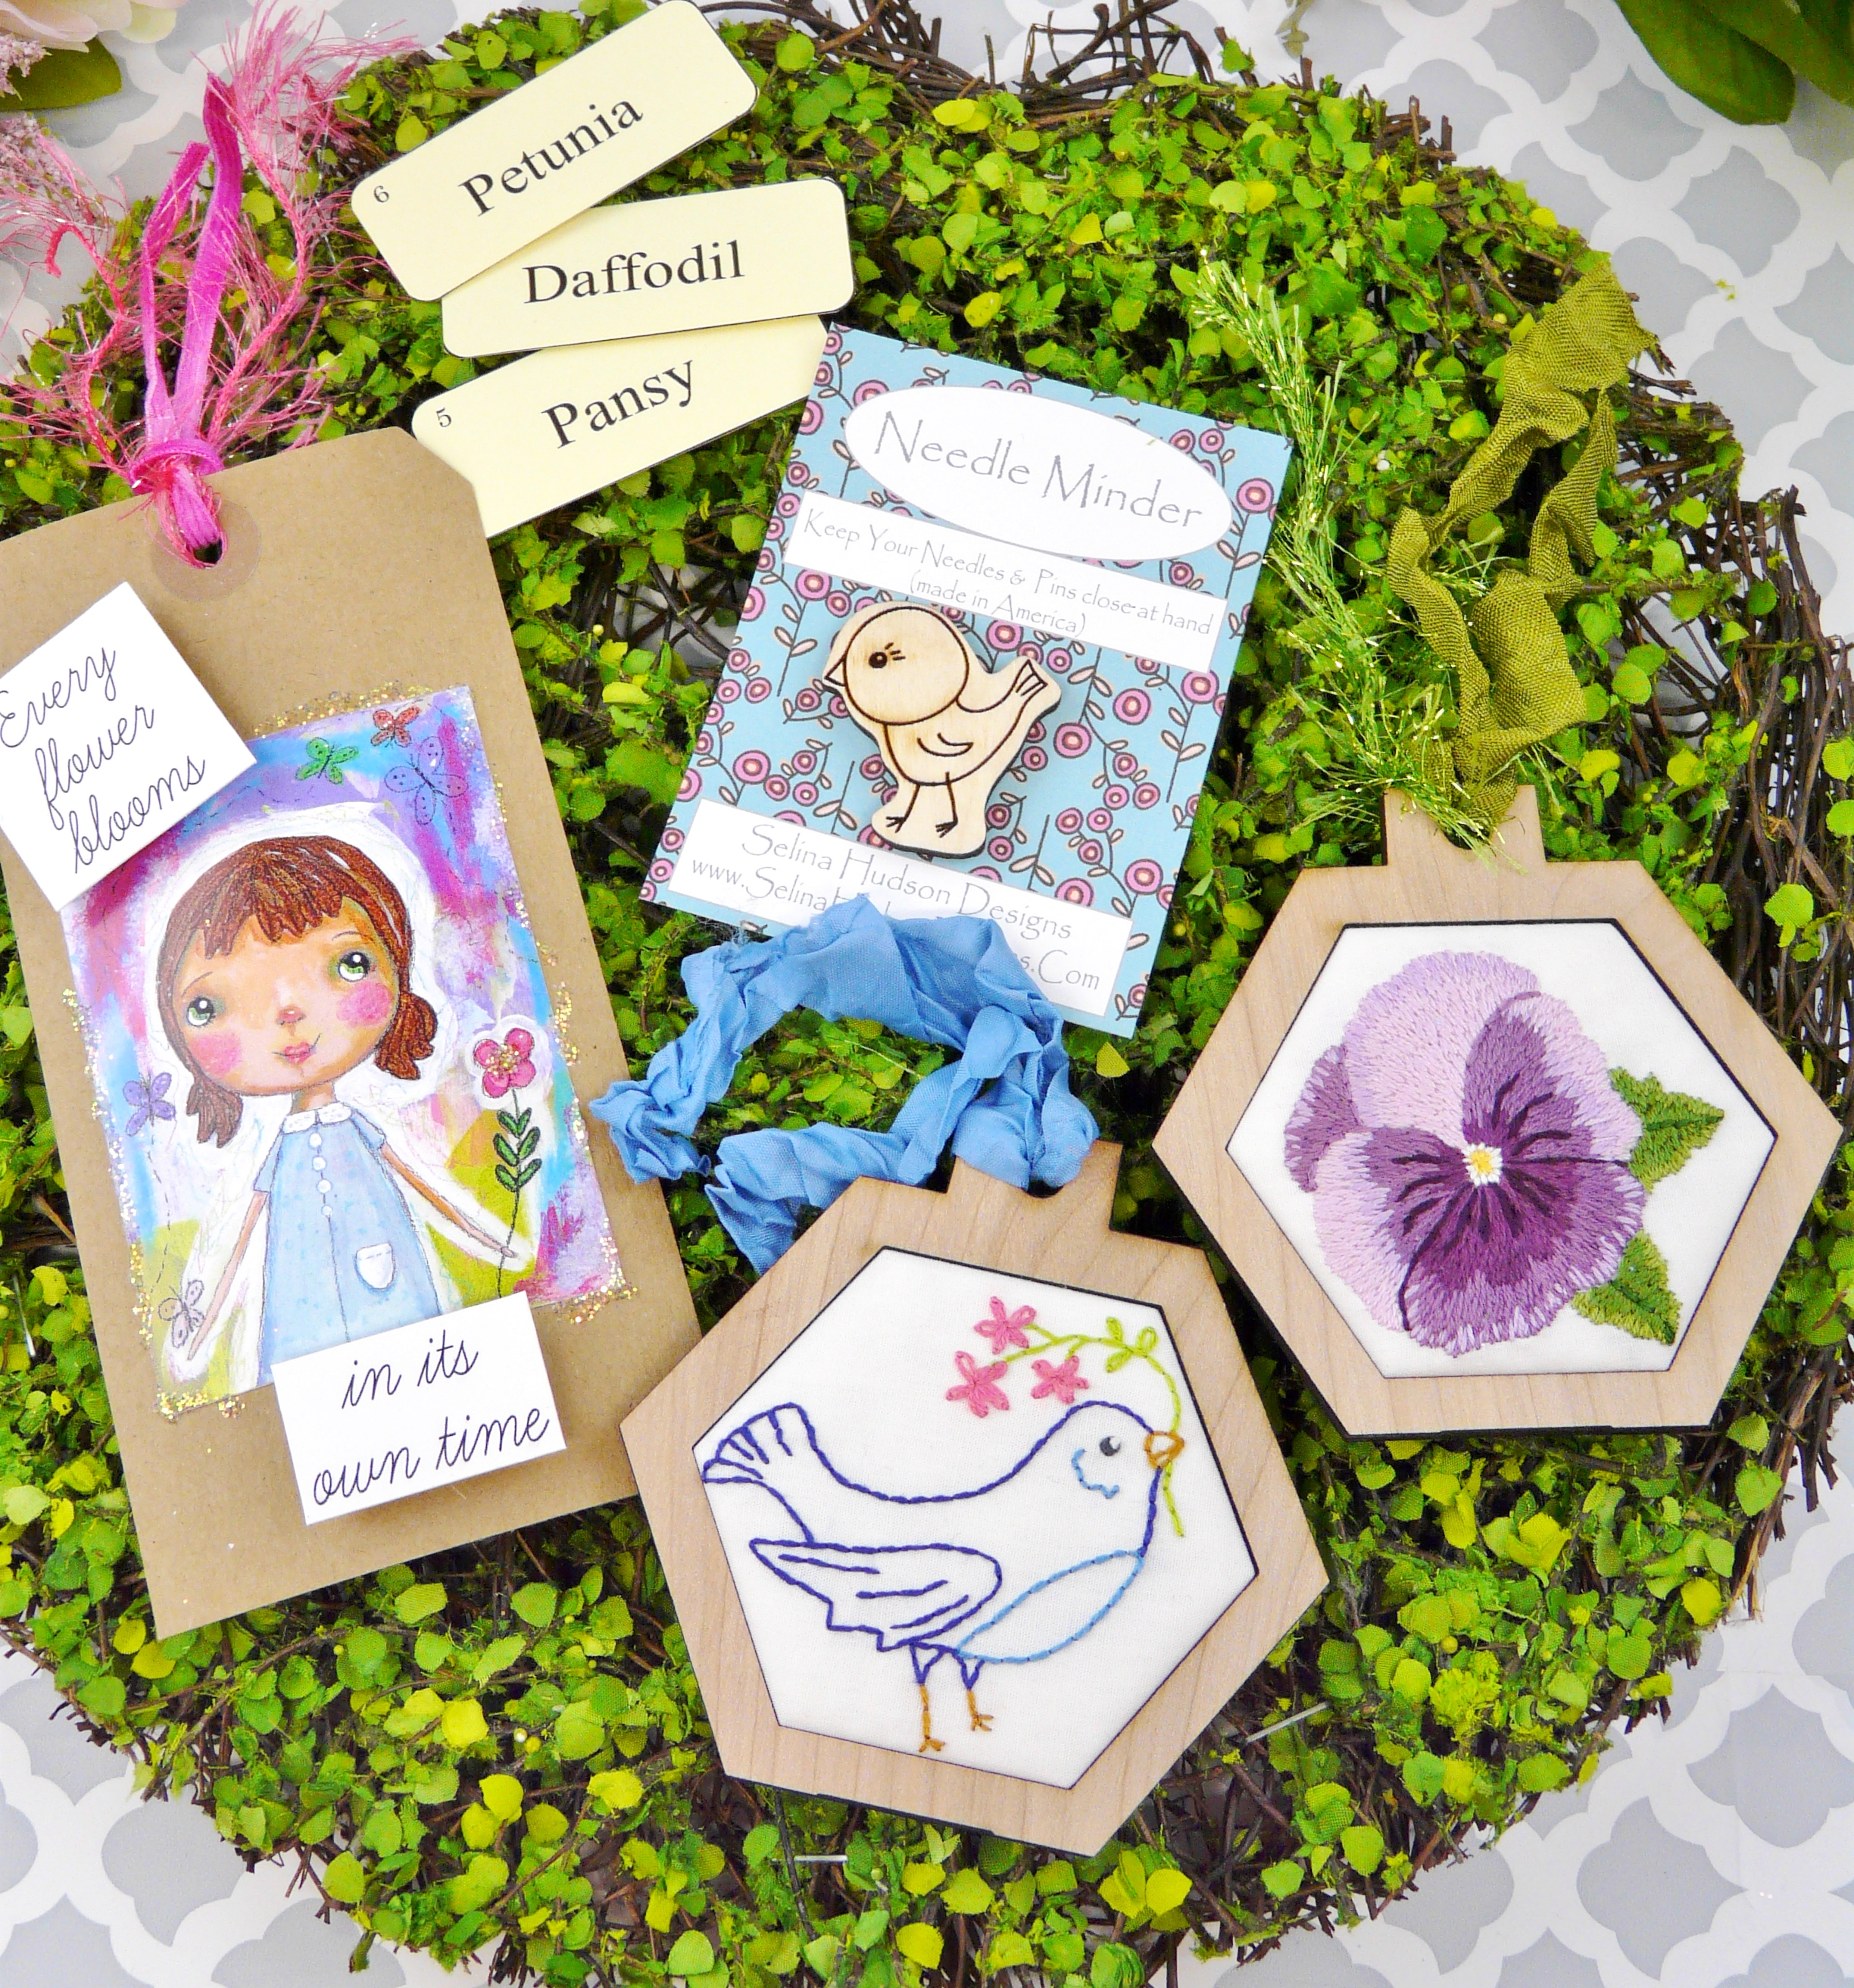
Here is the "July" surprise pack.... full of goodies to celebrate this month and upcoming patriotic holidays!
My daughter and I are collaborating on a fun July pack...that consists of:
My daughter and I are collaborating on a fun July pack...that consists of:

* 2 ornament Hexagons pack with "USA" banner &* kitty cat with flag design/pattern....with full instructions and some trims to use for hanging. (This is not the finished item...you create them with this pack)
Each one is 3 1/2" Tall and 3 3/4" Wide.... Then the inside (embroidery fits in here) 2 1/2" tall x 3".
Each ornament blank is plain wood but can be painted (watercolors work great!)
Each one is 3 1/2" Tall and 3 3/4" Wide.... Then the inside (embroidery fits in here) 2 1/2" tall x 3".
Each ornament blank is plain wood but can be painted (watercolors work great!)

* 1 Handmade art tag: Art (Patriotic girl- American as Apple pie) made from one of my paintings...turned into a print with red ribbon....tucked in a glassine bag. The tag measures: 3 1/8" wide x 6 1/4" tall. It is signed and dated.

* 1 little flag needle minder measuring: 1 1/2" x 3/4", made from wood, laser cut and has a very strong set of magnets to hold the needle minder in place on you embroidery hoop. It keeps your needles handy and it won't end up on the floor or couch.

* plus a couple extra goodies like small patriotic flash cards and.... a surprise!
-------------------

Celebrate all the Patriotic holidays!
This is a PDF pattern of: Patriotic Americana Pinnie- Embroidery & quilted pincushion pattern #419
Make these super easy and quick pincushions with scraps of fun fabric. Learn how to embroider a patriotic flag in a pot of flowers. Incorporate your small embroidery into a fun pinnie which makes a great gift. Sew up any of these cute sizes with tips to make them & machine quilt them in a flash! Each have a cute ribbon loop to attach your small scissors to it and decorative star pins.
Warning: These are addicting to make! Make them in any color of fabrics you want as well!
*******Plus....this pattern comes with a link to an exclusive video tutorial I made....just for you******
---------------------------------------------

Every month I make a new mugrug for my side table by my chair.
This month was a no brainer...I had to make it patriotic.
I have a ton of patriotic fabric....so choosing just a few was hard.

I quilted squares on the main part...just for something different.

Here is some general instructions:
Use a 1/4" seam allowance. Use the chart above.
Sew the featured fabric (camper) next to 3 strips of coordinating fabric.
Press well. Sew 1" strips all the way around. It is a good idea for the fabric border strips to be the same as the backing fabric. It makes the strips resemble quilt binding. Cut excess fabric and press. Layer batting and backing fabric (slightly larger than top) then lay top over backing (right sides together). Pin in place. Sew 1/4" around mug rug leaving a 3" opening. Turn inside out. Sew opening closed. Quilt squiggles on featured fabric and also quilt down strips and around the borders.
------------------------------------------------------------

This little big eyed dolly is a cutie~
This is an (embroidery sewing) pattern of: Sweet big eyed dolly- embroidery doll and mini Quilt pattern, #420. It is a digital download in my etsy shop. You can also find it as a printed/mailed to you pattern on my website.
This is an (embroidery sewing) pattern of: Sweet big eyed dolly- embroidery doll and mini Quilt pattern, #420. It is a digital download in my etsy shop. You can also find it as a printed/mailed to you pattern on my website.

Stitch up the sweetest big eyed dolly.. perfect for your kids or grand kids to play with or sitting on a shelf. She has heart lips and a cute bun on her head. She is wearing a dress with a heart flower in her pocket. She is tinted using colored pencils... super easy and fun! Her little quilt is checkered, very easy.

Finished Embroidery doll measures: 3 1/4"wide x 6 3/4"tall
Mini Quilt measures: 6" x 6".
Mini Quilt measures: 6" x 6".
----------------------------------------------
My new book is out in August!!!!

Make dolls with larger-than-life personalities!
Create festive dolls with bright colors and cheerful eyes guaranteed to bring warmth and joy to any home. My art dolls are easy to make and fun to paint using cloth, simple sewing, and fun embellishments. For every crafter of any skill set, follow the step-by-step process and detailed instructions for replicating four art dolls. Then, enjoy the gallery of doll photography for an inspirational springboard for making your unique creations. Every holiday can now have a new friend to add to the home decor, including a sweet bunny, spooky vampire, jolly snowman, and a lucky leprechaun. Bring special meaning to the holidays with handmade treasures

- Simple-to-make and easy-to-paint art dolls for any season or from any inspiration
- Dolls stitch together in a flash and are fun to paint using easy-to-follow instructions
- Kid-friendly! Crafters of any age will have fun making these dolls

This all started with my Halloween dolls...that sell the second I list them!
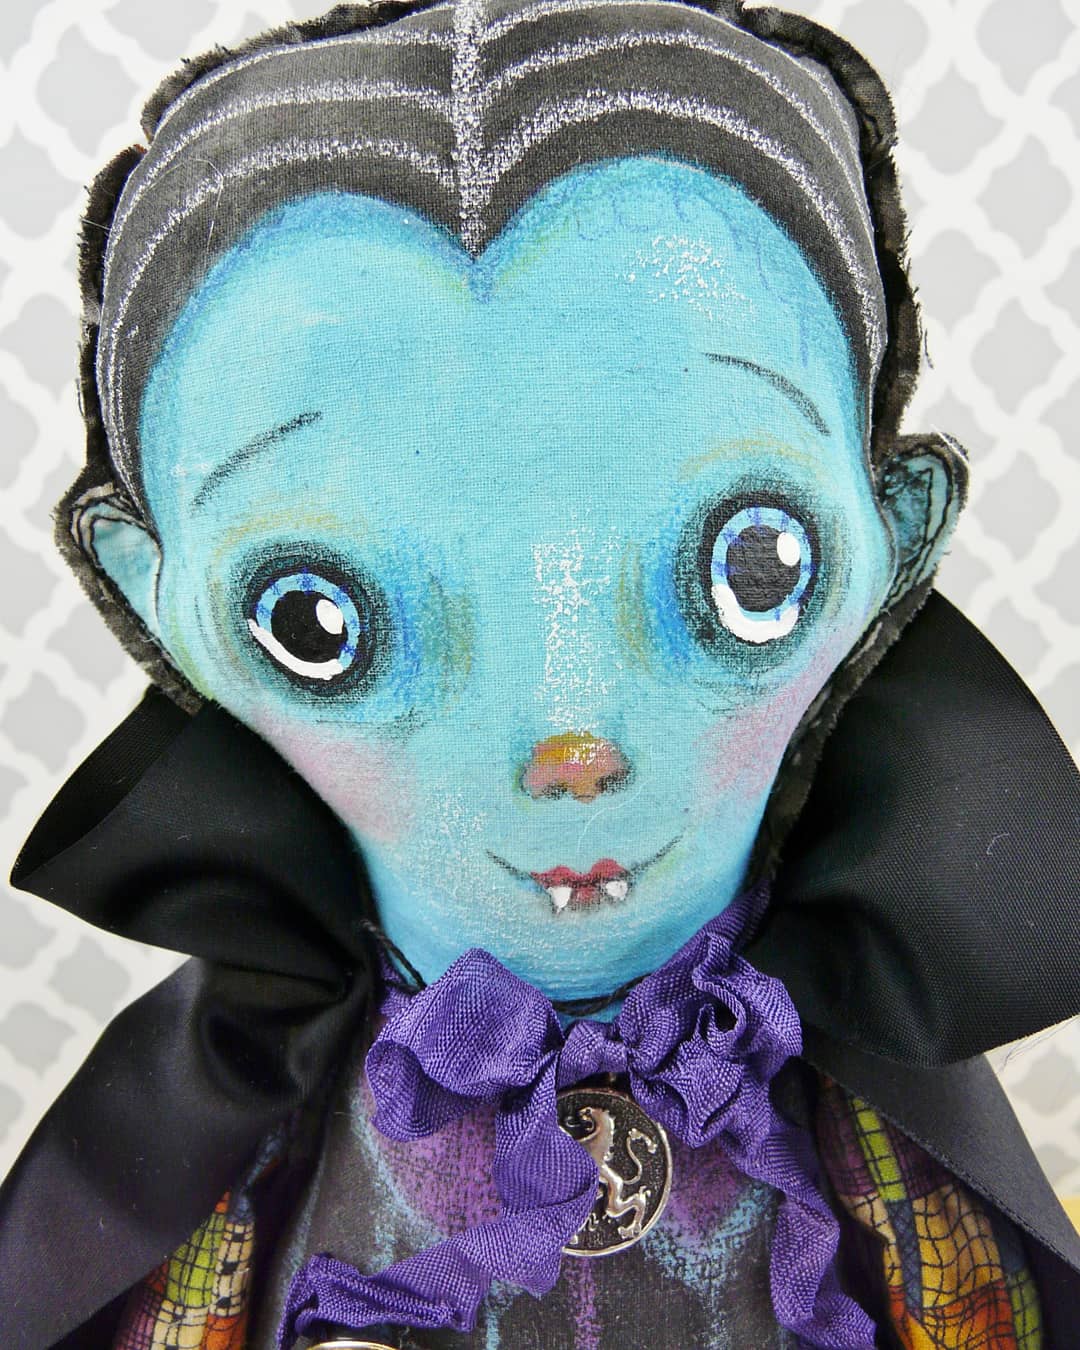
I made Dracula very blue, but he can be any color you want!

The skeleton named Skelly!
He is big on personality.

This little girl can hold a symbol of every time of the year....so much fun to make all these little holiday items.

I will be making more dolls soon if you want to buy them instead of making them....they sell fast though.
I am so happy about his book, It my second book....I never thought in a million years I would have this under my belt.
----------------------------------------

Meow!!!!

These kitty cat ornaments are fun to paint and add colorful strings and ribbons too.
THESE ARE BRAND NEW!
In my daughter Selina's listing you get 2 kitty cat wood ornaments.
These are not tinted (but you can easliy tint them by adding a wash of watercolor to them....so darned easy!!!) (Or paint pens like Bosca)
These are handmade in America! Add lace, ribbons, yarn, strings and glitter trims.
These Ornaments measure between: 2 1/4" wide x 2 1/2" high. Inside rectangle hole is 1 1/2" x 1/4" .

------------------------------------


This one looks great in my garden!
This is not tinted (but you can easliy tint them by adding a wash of watercolor to them....so darned easy!!!)
This cat wind hanger measure between: 4 1/2" wide x 5 1/4" tall. Inside rectangle hole is 3 1/4" x 1/2" .
This cat wind hanger measure between: 4 1/2" wide x 5 1/4" tall. Inside rectangle hole is 3 1/4" x 1/2" .
-----------------------------------------------
lastly.....
I'm having a big 4th of July sale in my etsy shop...
40% off all patterns, collage sheets, digital tags, flash cards, sheet patterns and every holiday!
****It starts now and ends on July 4th at midnight PST.


More fun designs!
------------------------------------


She has alot to choose from!
----------------------------

Have a very happy July!!!